
So we’re in the middle of testing Snowflake as a data warehouse solution and in addition to testing out it’s performance and general experience, I wanted to make sure that I was going to be able to communicate with it from a .net core application. Right off the bat, a few things sort of concerned me:
- Snowflake doesn’t have a .Net SDK (BigQuery and Redshift do), but they do have an ODBC driver that can be leveraged.
- I’ve only used custom ODBC drivers like once ever so… noideawhatimdoingdog.jpg
- I’m fairly certain once the driver is installed on the OS, using it is just like using any other ADO connection, I just have to use System.Data.Odbc instead of System.Data.SqlClient
- Oh wait… System.Data.Odbc wasn’t included in .Net Standard 2.0 … ruh roh
After digging around a bit, it turns out (at the time of this writing) that people were already complaining about this and Microsoft was already on it. It’s not available on NuGet quite yet, but it’s on their dev feed on MyGet at https://dotnet.myget.org/feed/dotnet-core/package/nuget/System.Data.Odbc YAY! So let’s see what’s up…
I’m going to yammer on a little bit, because I want to make sure and share some of the things I did in order to find the solution, but I’ll sum it up at the end. I’m using Snowflake as the example here, but concept here should be re-usable for any similar situation where you’re just trying to get an ODBC driver installed on a Linux docker image.
Proving the driver works the way I think it will
I tried this all out in steps just the make sure everything was working the way I thought it would be. For this first part, I just followed Snowflakes installation and configuration instructions, so I’m not going to go into too much detail here, but you can read for yourself (https://docs.snowflake.net/manuals/user-guide/odbc.html):
- Install the driver on my windows machine by running the MSI file provided by Snowflake. Go to ODBC Driver Manager (just type it in windows search and it’ll come up). Go to the “System DSN” tab and add the snowflake driver. Plug in a few bits of info as described in the documentation and then you’re G2G
- Spin up a new .Net Core app (I did a web API for simplicity in testing later) and do the ole ADO grab some data dance that we’ve all done before, except the connection string is much simpler. Since the bulk of the info is setup with the DSN, you just need a few things.
- Make sure you brought in that nuget package so that the System.Data.Odbc namespace is available
Using the default WebAPI template, I just added some good ole fashioned ADO nonsense to it to run a simple query and return the results. I’m going to just dump it out as a text array for simplicity:
|
1 2 3 4 5 6 7 8 9 10 11 12 13 14 15 16 17 18 19 20 21 22 23 |
// GET api/values [HttpGet] public IEnumerable<string> Get() { using (var conn = new OdbcConnection("Dsn=replica;Uid=testapp;Pwd=abcd1234")) { using (var comm = new OdbcCommand("SELECT Stuff FROM Some.Database LIMIT 100", conn)) { conn.Open(); comm.CommandType = CommandType.Text; var results = new List<string>(); using (var rdr = comm.ExecuteReader()) { while (rdr.Read()) { results.Add(rdr["SomeColumnName"].ToString()); } } return results; } } } |
So it’s basically just the connection name you set up and a user name and password. SPOILER ALERT: It worked…
Ok SWEET, so I proved that the driver works like I thought it would but… this test scenario is mostly useless because
- I want to run it in Docker which means it has to be installed on the base image
- I want to run that container on a Linux box so installing the driver is gonna be a bit different
- How the heck do I install the Snowflake ODBC driver on a Linux base image?
So after scratching my head for a while (I’m pretty new to Docker), I remembered how images are layered; you can use an existing image as a starting point and then build/tag it as your own after you’ve modified it. So my decision was “Derp. Use microsoft/aspnetcore:2.0 as the starting point, figure out how to install the driver there and then just that image for your application.” A little easier said than done, but I figured it out.
The Game Plan… first try
- I know I can run command line stuff on the image I’m building during the build phase, so I’ll need to do this all in the Dockerfile
- I should be able to just follow Snowflake’s directions on installing the driver on a Linux system and just adjust it for installation inside of a Docker image (see: https://docs.snowflake.net/manuals/user-guide/odbc-linux.html)
- It’s just Linux amirite?
Okay, so the first thing I needed to figure out is which Linux distro the aspnetcore was based on. To do this, I had to obviously pull that image down, but then I had to somehow login to it and get a command line. Turns out it’s no big deal.
- Assuming you have Docker installed on your machine and it is in Linux mode (required for any of this to make sense), open your shell of choice (powershell or bash — but you’ll need to sudo if you use bash) and type
docker pull microsoft/aspnetcore:2.0 - Make the image give you a bash prompt by then running
docker run -it microsoft/aspnetcore:2.0 /bin/bash. You should get a root prompt right there in the command window — you are inside of the container… oooooh — this is how I figured out what needed to be done - Now to see the distro, I typed
cat /etc/issueand it replied withDebian GNU/Linux 9 \n \l— Ok it’s a Debian distro… why did I care again? I forgot, but now you know how to do that!
So now that I’m inside of the image, I’m gonna play around and see what I need to do in order to get this thing installed. One of the first steps Snowflake tells you to make is to import the gpg using some gpg commands except… it turns out gpg doesn’t exist on this image. DAMMIT. So install it right? I ran apt-get install gnupg and it gave me some lip service about not being able to find that repo. Oh noes! To fix this, I happened to type in apt-get update and that restored enough to get moving again.
Alright, alright… I’ll stop giving you the play by play. I just wanted to share my frustration and how I tinkered with it to gather up enough information to move forward. The gist of it is that the image wasn’t ready for me to be installing anything new into it, so I had to fix that and then it was basically back to Linux commands through the Dockerfile from that point on. So here’s the solution…
The Solution
We’re gonna need to run a few commands within the Dockerfile to get the image ready for us to mess around first:
|
1 2 3 4 5 6 7 8 9 10 |
# we wanna base this on the aspnetcore image FROM microsoft/aspnetcore WORKDIR /req # copy all of our files into the image COPY . ./ # install stuff needed to install the other stuff RUN apt-get update \ && apt-get install -y apt-utils gnupg unixodbc |
So what we’re doing here is setting the base image that we’re going to modify. Then we run apt-get update which fixes the repo issue, then we install utils, the missing gpg command and the unixodbc driver manager that is suggested in Snowflakes docs.
Then I did some of the other steps with regards to importing the keys
|
1 2 3 4 |
# install keys - not sure how much of this is necessary RUN gpg --import snowflakeKey.asc \ && mkdir /usr/share/debsig/keyrings/69BE019A \ && gpg --no-default-keyring --keyring /usr/share/debsig/keyrings/69BE019A/debsig.gpg --import snowflakeKey.asc |
I’m not sure how much of it was actually necessary, and I didn’t do the validation because it was giving me trouble. Feel free to add it back in.
So after that, I actually installed the driver. For this and few other parts to follow, the required files need to be downloaded from Snowflake and located in the same folder as the Dockerfile: The Linux ODBC driver, the keys, and some config files that you’re going to replace. Apologize for how scattered this may seem, but I’ll recap at the end!
|
1 2 3 |
# install the driver RUN dpkg -i snowflake-odbc-2.13.13.x86_64.deb \ && apt-get install -f |
Snowflake’s instructions then go on to tell you to replace some config values and whatnot, but after looking at them, I figured it would just be easier to have them available during the build and replace them completely directly in the image, so I do that here in the next step:
|
1 2 3 |
# replace the config files RUN mv odbcinst.ini /etc/odbcinst.ini \ && mv odbc.ini /etc/odbc.ini |
These files should also be prepared and located in the same directory as the Dockerfile. The content of these ini files are actually described in the documentation, but I give some examples below. All I did was put all my config into them and then save them to my working directory (the one with the Dockerfile) so that I could pull them in during the build. I then tested the connection using the directions in Snowflake (isql -v <dsn> <username> <password>) while I had a command line in the container (all of this was done step by step while I was figuring out the Dockerfile. Then I built my WebAPI using my new image and tested it out, and it was able to make the same connection as it did in my test within the host windows environment, but now it was doing it from the Linux image! Successsssssss
Recap
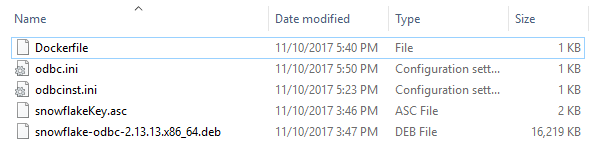
1 – Create a folder that you can work in and have all your required files in it
This is going to be our working directory from which we’ll build our custom image based on microsoft/aspnetcore:2.0. The keys (.asc) and the driver (.deb) package are available on Snowflake’s website. You will create the two ini files on your own and fill them with your specific config information (shown later).
2 – Have something like this in your Dockerfile
|
1 2 3 4 5 6 7 8 9 10 11 12 13 14 15 16 17 18 19 20 21 22 |
FROM microsoft/aspnetcore WORKDIR /req # copy all of our files into the image COPY . ./ # install stuff needed to install the other stuff RUN apt-get update \ && apt-get install -y apt-utils gnupg unixodbc # install keys - not sure how much of this is necessary RUN gpg --import snowflakeKey.asc \ && mkdir /usr/share/debsig/keyrings/69BE019A \ && gpg --no-default-keyring --keyring /usr/share/debsig/keyrings/69BE019A/debsig.gpg --import snowflakeKey.asc # install the driver RUN dpkg -i snowflake-odbc-2.13.13.x86_64.deb \ && apt-get install -f # replace the config files RUN mv odbcinst.ini /etc/odbcinst.ini \ && mv odbc.ini /etc/odbc.ini |
This will give your new base image what it needs to install everything, and then install everything and replace the config files.
Example odbcinst.ini file
|
1 2 3 4 5 6 7 8 9 10 |
[ODBC Drivers] SnowflakeDSIIDriver=Installed [SnowflakeDSIIDriver] APILevel=1 ConnectFunctions=YYY Description=Snowflake DSII Driver=/usr/lib/snowflake/odbc/lib/libSnowflake.so DriverODBCVer=03.52 SQLLevel=1 |
Example odbc.ini file
“[replica]” and “[analytics]” are going to be the actual DSN you use in your connection string. Notice that I used “Dsn=replica” in my WebAPI code example. ODBC will look for that section here in the ini file to make the connection.
|
1 2 3 4 5 6 7 8 9 10 11 12 13 14 15 16 17 18 |
[ODBC Data Sources] replica = SnowflakeDSIIDriver analystics = SnowflakeDSIIDriver [replica] Driver = /usr/lib/snowflake/odbc/lib/libSnowflake.so Description = server = <instance id>.snowflakecomputing.com database = <database name> warehouse = <warehouse name> [analytics] Driver = /usr/lib/snowflake/odbc/lib/libSnowflake.so Description = <some description> server = <instance id>.snowflakecomputing.com role = database = <database name> warehouse = <warehouse name> |
Snowflake docs talk about filling in your path in the ini files, but it turns out that the driver install sets a lot of it for you, so the paths here are likely going to be the same for you.
3 – Build your new base image
I’m going to call this one provausio/aspnetcore_snowflake.
You might wanna push this one to your container registry and use it for any of your applications that need this configuration. Do not push this to the public Docker Hub!
|
1 |
docker build -t provausio/aspnetcore_snowflake . |
4 – Create the Dockerfile for your WebAPI test project
I actually have 2 images used here. I use a different image for the build/publish environment, and then I use our new image for the application.
|
1 2 3 4 5 6 7 8 9 10 11 12 13 14 |
FROM microsoft/aspnetcore-build:2.0 AS build-env WORKDIR /app COPY . ./ RUN dotnet restore SnowflakeTest.Core.sln RUN dotnet publish SnowflakeTest.Core -c Release -o out -f netcoreapp2.0 FROM provausio/aspnetcore_snowflake WORKDIR /app EXPOSE 80 ENV ASPNETCORE_ENVIRONMENT=Production COPY --from=build-env /app/SnowflakeTest.Core/out . ENTRYPOINT ["dotnet", "SnowflakeTest.Core.dll"] |
5 – You should know what to do from here. Run that container and hit that endpoint. If you’re lucky, it’ll make the connection to the db and spit out some data 🙂
Let me know if this is too confusing and if I need to do a YouTube video for this 🙂